


Yet another guide WOOHOO! A Guide to…ANIMATEING!
This is for all of you people who are always like “HOW DO YOU MAKE A PICTURE MOVE?!” No, I will not do a guide on fading. If you really want to know how to make something fade, then just post and I will tell you in a quick explanation. And maybe provide a couple screenshots. FADEING A PIC TAKES FOREVER AND LOTSA LAYERS THOUGH!
Okayz so I decided not to use one of my OC’s for this one. Instead, I REALLY wanted to use TulipTail’s OC XD
So the first step to createing an animation is to draw it first. I am drawing it in a sorta spriteish format because I don’t really make animations any other way. You can make your lines as thick as you want. Also, I drew the initial picture in MS paint. You can draw yours wherever you want.
ANYWAY! That is not important. Here is the Initial picture:

Then, using other colors, draw over the picture. If you are drawing on GIMP, then all you need to do is use a different layer (I would suggest duplicating the first layer) But I am using MS paint. So I am using other colors. ONLY draw over the parts you want to be animated. This particular cat is going to be blinking and moving it’s tail. Mine looks like this:

So now I am going to copy the picture and paste it however many colors are on the picture. Then, on each picture, I will erase all except one of the colors, then make it black, Do this however many times you need until you have all of the layers you need for your animation. Here is mine:

Here is where I open up GIMP. Copy the first layer picture of your image. Oh, all of your pictures MUST be the same size for this to work by the way. Anyway, when you open up GIMP, you don’t even need to create a new picture. Just paste the picture. I would also suggest zooming in. Then create a new layer and move it under your picture.
If you used paint like me, then take the magic wand tool (blue circle) and shift + click every white space within your line art and press delete.
Another option instead of the magic want tool would be to use the color-picker tool (red circle) and just click the white space. Then ctrl + click all of the space outside the line art. Then press delete.
Either way, it should end up looking like this:

Now you will want to color. I am actually going to use the pencil tool instead of the paint brush tool. If you are coloring on the right layer, you should have no trouble. See my GIMP drawing guide for coloring help. I would suggest NOT merging your layers yet if you have a little bit of an advanced coloring like this cat.
Here is mine so far:

Now you will want to bring all of your other pictures in. Paste them all and use the magic wand or color picker tool to get rid of the white in the line art.
Now, click on the layer with the coloring on it. Duplicate that layer by right clicking and pressing duplicate layer, or the two little rectangles over-lapping each other in the layers box (red circle).
Move each copy beneath each picture and edit the coloring so it will fit right with each picture.
Also, a helpful tip is while doing this, to hide each layer you are not working with.
Now duplicate the layers as you see fit (in reverse order actually so the animation will repeat right) Here is mine so far:

Now to save your hard work. Oh, and you are on your own for transparency, because that hates me with animations. You will want to save this picture as a .GIF. Animations CAN NOT be any other file type.
Click file -> save as. The name of your picture should be _____.gif.
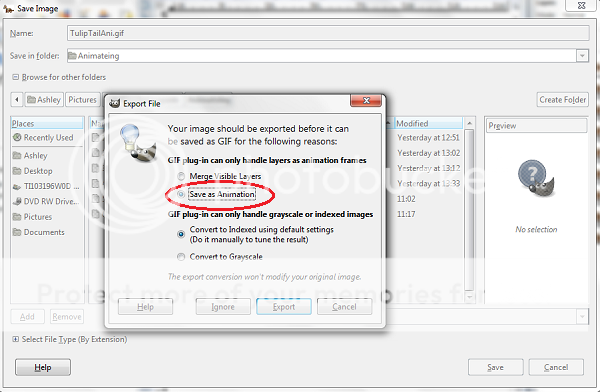
After you have named it click save and a little box should come up. DO NOT CLICK MERGE VISIBLE LAYERS! Click “save as animation” then click “export”
Now it should bring you to another box. The only thing you really need to do here is set the speed in between each frame. I will be putting 200 milliseconds in between each frame.
If you are unsure as to the amount of time you want in between each frame, then tpe in a number you think would work. After that then insert the picture into powerpoint then view the slide show. If it is too fast or too slow, then delete the picture (make sure it is STILL open in GIMP!) and then re-save it with a different speed. Powerpoint has GOT to be one of THE MOST useful programs there is.
Oh, and make sure "Loop forever" is checked. I had to re-save mine when I didnt click it. See below? I forgot to check it. X_X

Umm…back on topic…anyway! So after you save it you can upload and share!

Here ya go tulip! This is your cat. Oh one more thing…THIS WAS MADE FOR TULIP ALONE! No one may recolor it or use it for their own. If I catch you, you will have to deal with one very mad Vampire cat girl with her brain sucking cat-wolf little sister!
Other guides:
Drawing
Other Tools (not made)
Tracing over pics (use for theft and suffer the consequences!)
This is for all of you people who are always like “HOW DO YOU MAKE A PICTURE MOVE?!” No, I will not do a guide on fading. If you really want to know how to make something fade, then just post and I will tell you in a quick explanation. And maybe provide a couple screenshots. FADEING A PIC TAKES FOREVER AND LOTSA LAYERS THOUGH!
Okayz so I decided not to use one of my OC’s for this one. Instead, I REALLY wanted to use TulipTail’s OC XD
So the first step to createing an animation is to draw it first. I am drawing it in a sorta spriteish format because I don’t really make animations any other way. You can make your lines as thick as you want. Also, I drew the initial picture in MS paint. You can draw yours wherever you want.
ANYWAY! That is not important. Here is the Initial picture:
Then, using other colors, draw over the picture. If you are drawing on GIMP, then all you need to do is use a different layer (I would suggest duplicating the first layer) But I am using MS paint. So I am using other colors. ONLY draw over the parts you want to be animated. This particular cat is going to be blinking and moving it’s tail. Mine looks like this:
So now I am going to copy the picture and paste it however many colors are on the picture. Then, on each picture, I will erase all except one of the colors, then make it black, Do this however many times you need until you have all of the layers you need for your animation. Here is mine:
Here is where I open up GIMP. Copy the first layer picture of your image. Oh, all of your pictures MUST be the same size for this to work by the way. Anyway, when you open up GIMP, you don’t even need to create a new picture. Just paste the picture. I would also suggest zooming in. Then create a new layer and move it under your picture.
If you used paint like me, then take the magic wand tool (blue circle) and shift + click every white space within your line art and press delete.
Another option instead of the magic want tool would be to use the color-picker tool (red circle) and just click the white space. Then ctrl + click all of the space outside the line art. Then press delete.
Either way, it should end up looking like this:
Now you will want to color. I am actually going to use the pencil tool instead of the paint brush tool. If you are coloring on the right layer, you should have no trouble. See my GIMP drawing guide for coloring help. I would suggest NOT merging your layers yet if you have a little bit of an advanced coloring like this cat.
Here is mine so far:
Now you will want to bring all of your other pictures in. Paste them all and use the magic wand or color picker tool to get rid of the white in the line art.
Now, click on the layer with the coloring on it. Duplicate that layer by right clicking and pressing duplicate layer, or the two little rectangles over-lapping each other in the layers box (red circle).
Move each copy beneath each picture and edit the coloring so it will fit right with each picture.
Also, a helpful tip is while doing this, to hide each layer you are not working with.
Now duplicate the layers as you see fit (in reverse order actually so the animation will repeat right) Here is mine so far:
Now to save your hard work. Oh, and you are on your own for transparency, because that hates me with animations. You will want to save this picture as a .GIF. Animations CAN NOT be any other file type.
Click file -> save as. The name of your picture should be _____.gif.
After you have named it click save and a little box should come up. DO NOT CLICK MERGE VISIBLE LAYERS! Click “save as animation” then click “export”
Now it should bring you to another box. The only thing you really need to do here is set the speed in between each frame. I will be putting 200 milliseconds in between each frame.
If you are unsure as to the amount of time you want in between each frame, then tpe in a number you think would work. After that then insert the picture into powerpoint then view the slide show. If it is too fast or too slow, then delete the picture (make sure it is STILL open in GIMP!) and then re-save it with a different speed. Powerpoint has GOT to be one of THE MOST useful programs there is.
Oh, and make sure "Loop forever" is checked. I had to re-save mine when I didnt click it. See below? I forgot to check it. X_X
Umm…back on topic…anyway! So after you save it you can upload and share!
Here ya go tulip! This is your cat. Oh one more thing…THIS WAS MADE FOR TULIP ALONE! No one may recolor it or use it for their own. If I catch you, you will have to deal with one very mad Vampire cat girl with her brain sucking cat-wolf little sister!
Other guides:
Drawing
Other Tools (not made)
Tracing over pics (use for theft and suffer the consequences!)


» Hey!!! Lightningstorm here. What's up?!
» has every one read the rules!?
» Heuy, i'm nrw here, and i'm Blagonet!
» Question!!! O.o
» apprentice to warrior
» Warrior Word Game
» warriors a-z
» Hawkfeather's Birthday!